WordPress stack containers
Apache
New Apache image
Since Drupal stacks 5.2.0+ Apache image wodby/php-apache has been replaced with wodby/apache with $APACHE_VHOST_PRESET=php
- Apache can be configured with the following environment variables
- Installed apache modules
Restarting apache as default user:
sudo httpd -k restart
See details about virtual host preset.
AthenaPDF
See AthenaPDF stack documentation.
Crond
Resources limitation
By default we limit crond container memory to 512M (request 8Mb) for all environments and limit CPU to 1 core (request 0.1 core) on production environments.
A duplicate of the main PHP container runs with crond (instead of FPM). You can customize crontab from [Instance] > Stack > Settings page.
Mailhog
If Mailhog service enabled and chosen as Mail delivery service at [Instance] > Stack > Settings all outbound email will be caught by the Mailhog. You can view and release these emails from Mailhog UI, the URL can be found from Domains tab. When release specify opensmtpd in SMTP server field if you want to release emails to the default Mail transfer agent (OpenSMTPD).
MariaDB
See MariaDB stack documentation.
Memcached
You can check the status of memcached and its hits by running the following command.
watch "echo stats | nc 127.0.0.1 11211"
Nginx
Nginx can be configured with the following environment variables
Restarting nginx as default user:
sudo nginx -s reload
Do not gzip pages in your application
We already gzip content on Nginx side and it works faster. Having double gzip may cause issues.
Modules
Installed nginx modules.
PageSpeed
Nginx comes with mod_pagespeed which is disabled by default. To enable it add NGINX_PAGESPEED_ENABLED=1 environment variable to Nginx service. For more details see https://github.com/wodby/pagespeed.
ModSecurity + OWASP
Nginx comes with ModSecurity which is disabled by default. To enable it add NGINX_MODSECURITY_ENABLED=1 environment variable to Nginx service. For more details see https://github.com/wodby/modsecurity.
Custom config
If a config preset and available environment variables are not enough for your customizations you can use your own virtual host config:
- Copy
/etc/nginx/conf.d/vhost.confto your codebase, adjust to your needs - Deploy code with your config file
- Add new environment variable
NGINX_CONF_INCLUDEfor nginx service, the value should the path to your*.conffile (e.g./var/www/html/vhost.conf). The specified file will be included in/etc/nginx/nginx.conf
Default virtual host preset: wordpress
Node.js
Light-weight node.js container to help you build your application's frontend. The containers comes without any global pre-installed packages, you can add them by running yarn global add PACKAGE or by running yarn in a directory with your package.json file.
OpenSMTPD
See OpenSMTPD stack documentation.
PHP
- PHP can be configured with the following environment variables
- Available php extensions
Environment variables
Variables availability
Environment variables (except ones provided by Wodby) won't be available in PHP-FPM because we set PHP_FPM_CLEAR_ENV=yes by default for security reasons. You can set it to yes to make all environment variables available in your code.
In addition to global environment variables, we provide the following variables in PHP container that you can use in your post-deployment scripts or settings files:
| Variable | Description |
|---|---|
$APP_ROOT |
/var/www/html by default |
$HTTP_ROOT |
e.g. /var/www/html/web |
$CONF_DIR |
/var/www/conf by default |
$WODBY_APP_NAME |
My app |
$WODBY_HOST_PRIMARY |
example.com |
$WODBY_URL_PRIMARY |
http://example.com |
$WODBY_HOSTS |
[ "example.com", "dev.example.org.wodby.cloud" ] |
Deprecated variables:
| Variable | Instead use |
|---|---|
$WODBY_APP_ROOT |
$APP_ROOT |
$WODBY_APP_DOCROOT |
$HTTP_ROOT |
$WODBY_CONF |
$CONF_DIR |
$WODBY_DIR_CONF |
$CONF_DIR |
Files directory permissions
Public files directory (symlink to /mnt/files/public) that used for uploads owned by www-data user (PHP-FPM user) by default and the default container user (wodby) has no writing permissions. So if you run a command that creates files in a public directory you will get insufficient permissions error. You can fix this problem by giving writing permissions for files directory to the owner's group (user wodby is a member of www-data group) by using one of the helper scripts:
sudo files_chmod /mnt/files/public
When you manually import files under wodby user you should change files ownership to www-data user to let PHP-FPM create new files in directories, run the following command to change the ownership:
sudo files_chown /mnt/files/public
Helper scripts scope
files_chmod and files_chown are the only sudo commands available to wodby user and can be applied only to directories under /mnt/files .
For mode details about users and permissions in PHP container see https://github.com/wodby/php#users-and-permissions
Codebase directory permissions
The codebase owned by the default wodby (uid/gid 1000) user. If you need to give writing permissions to PHP-FPM (www-data user with uid/gid 82) to a directory outside on public files directory you can either access a container as root user or change it from the host server (single-server infrastructure):
chown -R 1000:82 /srv/wodby/instances/[INSTANCE_UUID]/app/path-to-directory
chmod -R 775 /srv/wodby/instances/[INSTANCE_UUID]/app/path-to-directory
NewRelic
You can add NewRelic APM monitoring for PHP by adding environment variables PHP_NEWRELIC_ENABLED=1 and PHP_NEWRELIC_LICENSE with your license number to PHP-FPM container. Application name will be automatically set to [Wodby Application Name] - [Wodby Instance Name], if you want to change it, use PHP_NEWRELIC_APPNAME.
Profiling
Must know before using profiler
- Both XHProf and Xdebug profiling decreases performance and increases resources usage, especially xdebug. Try to avoid using in production
- Traces files take a lot of disk space and may cause out of disk space very quickly
XHProf
Enable XHProf extension by overriding the environment variable PHP_EXTENSIONS_DISABLE="" to your PHP container (by default, it's set to xdebug,xhprof).
Use the following example snippet to profile your code:
// Start profiling.
if (extension_loaded('xhprof')) {
    xhprof_enable(XHPROF_FLAGS_MEMORY | XHPROF_FLAGS_CPU);
}

// Code which should be profiled.
// ...

// Store profile.
if (extension_loaded('xhprof')) {
    $xhprof_out = '/mnt/files/private/xhprof';

    if (!file_exists($xhprof_out)) {
        mkdir($xhprof_out);
    }

    file_put_contents(sprintf('%s/%s.%s.xhprof', $xhprof_out, uniqid(), 'web'), serialize(xhprof_disable()));
}
Once traces files generated you can view and analyze your traces via XHProf viewer
Xdebug profiler
Enable XDebug profiling by adding the following environment variables to your PHP container (! xdebug env vars have changed since version 3.x):
PHP_XDEBUG: 1
PHP_XDEBUG_MODE: profile
PHP_XDEBUG_START_WITH_REQUEST: trigger
PHP_XDEBUG_TRIGGER_VALUE: 1
Add XDEBUG_PROFILE=1 param to GET or POST request (or set a cookie) you want to profile. Xdebug will generate profile files in /mnt/files/xdebug. Click Update in Webgrind to access the new information. See https://xdebug.org/docs/profiler to learn more about xdebug profiling.
Once traces files generated you can view and analyze your traces via Webgrind
Xdebug
Debugging locally
For using xdebug locally see documentation for local environment
Follow these steps to debug your application instance remotely with xdebug:
- Enable xdebug for your instance from
[Instance] > Stack > Settings - Set up forwarding for xdebug: copy Xdebug SSH tunnel command from
[Instance] > Stack > SSH server (PHP)and run on your local machine - Make sure you have your IDE xdebug listener running on port 9000
- Start debugging in IDE
- Start your browser debug helper plugin (Chrome or Firefox) and open the page you want to debug
For xdebug troubleshooting enable logs by adding $PHP_XDEBUG_REMOTE_LOG=/tmp/php-xdebug.log environment variable to PHP container.
Xdebug troubleshooting
Enable xdebug logs to get more information by adding $PHP_XDEBUG_REMOTE_LOG=/tmp/php-xdebug.log environment variable to PHP container.
WP CLI
PHP container comes with pre-installed WP CLI.
Redirects
If you need to make a redirect from one domain to another you can do it by customizing configuration files of nginx or by adding the snippets below to your wp-config.php file.
Redirect from one domain to another:
if (isset($_SERVER['WODBY_ENVIRONMENT_TYPE']) && $_SERVER['WODBY_ENVIRONMENT_TYPE'] == 'prod' && php_sapi_name() != "cli") {
    if ($_SERVER['HTTP_HOST'] == 'redirect-from-domain.com') {
      header('HTTP/1.0 301 Moved Permanently');
      header('Location: http://redirect-to-domain.com' . $_SERVER['REQUEST_URI']);
      exit();
    }
}
Redirect from multiple domains:
if (isset($_SERVER['WODBY_ENVIRONMENT_TYPE']) && $_SERVER['WODBY_ENVIRONMENT_TYPE'] == 'prod' && php_sapi_name() != "cli") {
    $redirect_from = array(
      'redirect-from-domain-1.com',
      'redirect-from-domain-2.com',
    );

    if (in_array($_SERVER['HTTP_HOST'], $redirect_from)) {
      header('HTTP/1.0 301 Moved Permanently');
      header('Location: http://redirect-to-domain.com' . $_SERVER['REQUEST_URI']);
      exit();
    }
}
PostgreSQL
See PostgreSQL stack documentation.
Redis
You can configure Redis via environment variables that listed at https://github.com/wodby/redis. See Redis stack for more details.
Integration:
- Install and activate redis plugin
- Go to redis plugin settings page and click "enable object cache" button
Rsyslog
Rsyslog can be used to stream your applications logs. It's similar to using syslog, however there's no syslog in PHP container (one process per container). Rsyslog will stream all incoming logs to a container output.
You can use Monolog with SyslogUdpHandler to stream logs to rsyslog.
SSHd
A duplicate of PHP container runs with SSH daemon (instead of FPM). You can find access information on [Instance] > Stack > SSH
Public SSH keys from your Wodby profile will be added automatically for all users that have access to an instance.
Varnish
New Varnish image
Since WordPress stacks 5.2.0+ Varnish image wodby/wordpress-varnish has been replaced with wodby/varnish and $VARNISH_CONFIG_PRESET=wordpress
Integration:
- Go to
App instance > Stack > Varnishin Wodby dashboard and copy automatically generated value of$VARNISH_PURGE_KEY - Install and activate Varnish Caching plugin in your WordPress website
- On the plugin cache settings configure as shown below:
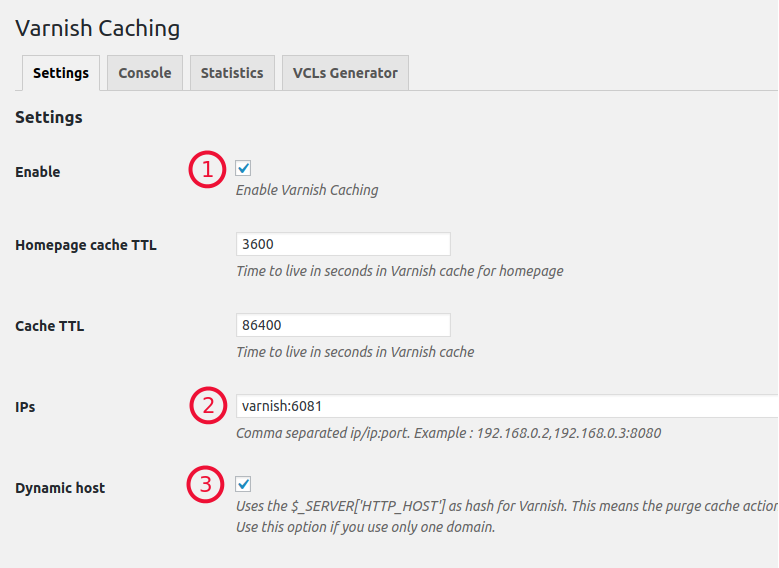
- Copy/paste the key to
Purge keyin plugin setting - Save all plugin settings changes
For more details see Varnish stack documentation
Webgrind
Webgrind allows you view and analyze Xdebug profiler output and generate call graphs for visualisation.
XHProf viewer
XHProf viewer allows you view and analyze XHProf traces output and generate call graphs for visualisation.